Tutorial-Hot Chocolate Wallet (Christmas Wrap-up #5)

Hot Chocolate Wallet-A Free Tutorial from Everything Pudding, Use up your fabric scraps with this easy wallet that holds four hot chocolate mix packets and is perfect for travel or a camping trip

We’re down to the last Christmas Wrap-up post and this time I’ve got another free tutorial for you, a Hot Chocolate Wallet. This wallet is designed to hold 4 hot chocolate mix packets. You could use this when you’re going on a camping trip or visiting friends to ensure that you always have your favorite hot chocolate mix with you.

Hot Chocolate Wallet-A Free Tutorial from Everything Pudding, Use up your fabric scraps with this easy wallet that holds four hot chocolate mix packets and is perfect for travel or a camping trip

This is a really easy project to make and is great for using up small pieces of leftover fabric. I’ve already made three of these using leftover fabric so I’m starting to make a dent into my large stash. I made my first one in order to figure out whether the idea I had in my head would work out exactly as I thought it would. I picked this cute flower pattern to use for my first go and it worked out really well. I didn’t have to change anything when I went and made the next two that I gave as Christmas gifts.

Hot Chocolate Wallet-A Free Tutorial from Everything Pudding, Use up your fabric scraps with this easy wallet that holds four hot chocolate mix packets and is perfect for travel or a camping trip

So now it’s your turn. Download the tutorial here: Hot Chocolate Wallet Tutorial and start sewing!

As always, this tutorial is for personal use only. You may not reproduce this and you may not make items from this tutorial to sell. Thanks for respecting my hard work!

Project-Hand Sanitizer Jacket (Christmas Wrap-up #4)

Hand Sanitizer Jacket-Dress this necessity in it's very own pretty jacket Find out more from Everything Pudding

I’m getting down to the end of my Christmas Wrap-up posts. Only one more post (with a new tutorial) after this one. Today I’m sharing with you the hand sanitizer jacket I made based on a tutorial by The Inspired Wren which you can also download for free from Craftsy. It’s a practical project and is also great for using up scraps. I’ve already got plans to make some more of these to use up some of my large remnant stash.

Hand Sanitizer Jacket-Find out more from Everything Pudding

The original tutorial called for a 2 oz. bottle of hand sanitizer. However, when I went to Walmart they only had 2.5 oz. bottles. You can see the difference in size between the one I got (on right) and a 2 oz. bottle my sister had. Because of the size difference I made my fabric pieces slightly bigger than called for in the tutorial.

Hand Sanitizer Jacket-Find out more from Everything Pudding

I made a number of changes to the materials I used due to what I had on hand and due to the larger size bottle. Below is a breakdown of the difference with the original materials called for in parentheses:

What I Used
(What It Called For)

2.5 oz. bottle of Hand Sanitizer
(2 oz. bottle of Hand Sanitizer)

2 – 2 3/4″ x 10 1/2″ piece of lightweight fabric
(2 – 2 1/2″ x 10″ pieces of indoor/outdoor canvas)

2 – 2 3/4″ x 10 1/2″ piece of medium-weight interfacing – additional interfacing used to strengthen the fabric since it was a lighter weight fabric
(2 1/2″ x 10″ piece of medium-weight Interfacing)

5 1/4″ x 3″ lightweight fabric – for handle, see method used below
3″ of 3/4″ elastic – for belt
(8″ of 3/4″ fold-over elastic – for the elastic belt and the elastic handle)

5/8″ button – without a shank
(1/2″-3/4″ button – preferably with a shank)

Handle

As mentioned above, the tutorial originally called for a handle made using elastic (specifically she used fold-over elastic). I really liked the look of the fold-over elastic used as a handle however decided not to do this because I didn’t have any on hand and because fold-over elastic stretches out really easily so being used as the handle for the jacket meant it would probably stretch out over time. Instead I used a piece of fabric. I’m sure you’re probably familiar with this way of making handles/straps, but I’ll just quickly brief you on the way I did mine.

Hand Sanitizer Jacket-Find out more from Everything Pudding

  1. Fold piece of fabric in half, press.
  2. Unfold and fold both sides into the middle, press.
  3. Unfold and fold down 1/4″ on one end (so that you have a finished edge), fold along middle crease, and press.
  4. Sew all the way around to make one large rectangle (sewing the bottom edge isn’t necessary but I decided to do it anyway).
  5. Insert buttonhole following tutorial’s instructions. I did find that I had trouble doing the button hole because there was nothing which I could hold onto to “feed” it through my machine. It took me several tries but I finally figured out that I had to do the buttonhole slightly farther from the end than called for (it was still long enough and didn’t cause a problem) and I stuck pins into both side of the end of the piece so I could push the fabric through when it got caught while making the buttonhole.

This project did take me longer than I thought it would. This was due to the fact that I used some different materials (required more time to figure out what to use and cut out fabric) and that I had to redo the two different buttonholes several times. But I finally finished it, it turned out well, and best of all the recipient, my little sister, really liked it.

There are only two things that I plan on doing differently next time I make these.

  1. Find a 2 oz. bottle. The 2.5 oz bottle was oddly shaped and seemed large, while the 2 oz. bottle my sister had was better shaped and slightly smaller. (Note: If you end up using a 2.5 oz bottle I would alter it like I did but instead of 10 1/2″ long piece which is what I originally did, I would make them 11″ long. It was a little tight lengthwise.)
  2. Use coordinating fold over elastic for the elastic belt (didn’t have any on hand, otherwise I would’ve used it originally).

Hand Sanitizer Jacket-Find out more from Everything Pudding

This project is great for using up little scraps, and once you’ve mastered the art of buttonholes, shouldn’t take you too much time. So grab some fabric from your stash, pick up the tutorial from The Inspired Wren on Craftsy, and start sewing!

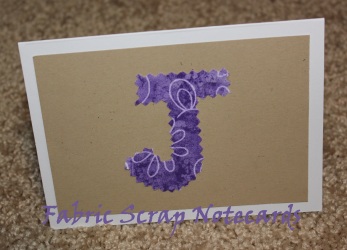
Tutorial-Fabric Scrap Notecards

Fabric Scrap Notecards 1 for Post Cover

I really hate to call this a tutorial because in all honesty it is little more than do this and this and you’re done. But I did.

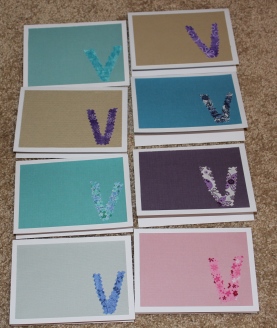
Fabric Scrap Notecards 2

I had a friend’s birthday party to go to and wanted to make a quick gift (sort-of left it to the last minute). (Also because this was such a last minute thing the pictures are minimal and of poor quality). Stationary is always an easy thing to make but I wanted to do mine differently and not just go with plain paper. My mind went back to this card I had seen on pinterest. However being that it was late spring I chose to do the cards with an initial. Here’s how I did it:

You Will Need:

  • Fabric Scraps at least 3″ x 3″
  • Coordinating Cardstock
  • Blank white cards and envelopes
  • Double-stick tape
  • Tacky Glue
  • Pinking Shears
  • Paper Cutter

How To Do It:

1. Cut your chosen letter out of your fabric scraps using pinking shears. I chose to do it freehand but you could use a stencil if you wanted. The size of your letter will depend on how big you want it, if you want to put it in the corner I would use a small letter, if it’s going to be in the middle go big.

2. Cut a piece of coordinating cardstock using your paper cutter one half inch less than the dimensions of your card (if your cards are 4″ x 5 1/2″ cut a piece 3 1/2″ x 5″).

3. Glue the fabric letter to the piece of cardstock, allow to dry.

4. Use double stick tape to attach the cardstock piece to the card centering with 1/4″ margins.

Done!

Notes:

1. The fabric scraps allowance 3″ x 3″ is very generous and will give you room to do as big a letter as you would want on a regular size card. Depending on your letter, (if you did an “I” for example you might only need a piece 2 1/2″ x 1″) you might need less, but this measurements give you room for error and big letters.

2. I chose to use white cards though you could use coordinating cardstock and make your own cards skipping the extra layer of cardstock. I buy a pack of 50 cards and envelopes from Hobby Lobby. With a coupon they are a very cheap way to buy cards and envelopes (since envelopes seem to be crazy expensive). You can find them in white and ivory in several different sizes though I like the 4″ x 5 1/2″ size.

3. A great way to buy cardstock that will coordinate with your fabric scraps is to buy a matstack. We got this one and one in pastels from JoAnns. These are great because they are just bigger than the size needed to make cards like these.

4. You could always do something other than an intial, you could make a flower using pink scraps for the bloom and green scraps for leeves and stem, be creative.