Recipe-Copycat Auntie Anne’s Pretzels

IMG_7272Is your mouth watering yet? Don’t they look amazing? They are! Want to know how to make them? No, I can’t tell you, it’s a secret.

Here’s the recipe.

My sister found this recipe from Yammie’s Noshery. One Saturday she made them. They were amazing. They made twelve and as there were only six people home at the time we each got two. I ate both, felt stuffed afterwards, but the they were worth it. I highly recommend you try them. I was a little skeptical as to whether they would taste like Auntie Anne’s but they did. Be sure and try them out yourself. The best part; eating them, but forming them was fun too! We have made them twice so far and everyone has loved them.

Just a couple of things about this recipe:
1. The recipe also has a recipe for cheese sauce. We did not make the cheese sauce as we didn’t think it would be good with them. But that is your own personal opinion.
2. Right when they come out of the oven you dip them all over in melted butter. We ended up needed about twice the amount of butter to coat all twelve.
3. Be generous when salting them, but also be careful; it’s hard to get the balance right. First time she made them she didn’t put enough salt, second time there was too much salt on some of them.

I hope you enjoy making these pretzels!

Knitting Technique: One-Needle Cast On

Most of us like quick and easy methods of doing something. I do. Sometimes the quick and easy method seems more difficult to start with than the regular way. That is what I thought of the one-needle cast on method. For however many years I’ve been knitting (probably 6+) I have used the traditional method of casting on. The one-needle way intimidated me and I had no reason to try it.

Then I started knitting a Beaded Lace Scarf. This new project (which I will hopefully do a post on soon) was started by casting on using the one-needle cast on method. This method was necessary so that the beads could be “part of” the cast on row. I now had to learn the method and I did. I consulted my trusty Klutz Knitting Book and followed their instructions and illustrations. I practiced using scrap yarn so as not to mess up my nice yarn. It took me a couple tries but I finally got it and realized what I had been missing out on. It was so easy and fast. I will not be using the traditional method anymore.

Since some of you knitters out there may want to try it I found a good video of it online. You can also probably find instructions in any learn to knit books that you have. This video has a very good explanation and you can clearly see how the lady did it. You can view the video here.

Note that this method of cast on is more commonly know as Long-tail Cast on and also Continental Cast on, and Double Cast on. I believe there are one or two other methods for casting on with one needle but this is the one I saw in my knitting book and the one my pattern used.

I hope this is helpful.

Chocolate Peanut Butter Banana Milkshake Recipe

I’m a swimmer on a competitive swim team, therefore I eat a lot. I also love chocolate, peanut butter, and milk but hate bananas. This is one of my favorite milkshakes. After a morning practice I come home and make several batches of this (necessary so that everyone home gets some). This shake has a chocolate peanut butter flavor but you can’t taste the bananas at all. That’s why, even though I hate bananas, I love this shake. My sister came up with the exacts for this recipes though none of it gets measured out, just estimated. Depending on the size of the bananas the shake may be smoother or thicker. To get the right consistency you can either add more bananas or add more milk, it’s whatever you like. I hope you enjoy it.

Chocolate Peanut Butter Banana Milk Shake

You Will Need:

2 Cups 1 % Milk

1 Tablespoon Hershey’s Chocolate Syrup

2 Tablespoons Smucker’s Natural Creamy Peanut Butter

2 Medium Sized (7”-7 7/8” long) Frozen Bananas

Make It:

  1. Combine Milk, Chocolate Syrup, and Peanut Butter in Blender. Mix until combined.
  2. Add frozen Bananas and blend on high speed until shake is smooth.
  3. Enjoy!

Makes: ~2-2 Cup servings

Nutrition Facts per Serving: Calories 332.4 Total Fat 10.9 g Saturated Fat 2.9 g Polyunsaturated Fat 2.4 g Monounsaturated Fat 4.7 g Cholesterol 12 mg Sodium 165.2 mg Potassium 805.9 mg Total Carbohydrates 48.2 g Dietary Fiber 4.1 g Sugars 32.7 g Protein 13.1 g Vitamin A 11.5% Vitamin B-12 17.9% Vitamin B-6 38.7% Vitamin C 17.9% Vitamin D 31.7% Vitamin E 2.1% Calcium 29.9% Copper 8.7% Folate 8.7% Iron 4.1% Magnesium 16.2% Manganese 10.7% Niacin 4.3% Pantothenic Acid 11.9% Phosphorus 26.1% Riboflavin 33.8% Selenium 13.5% Thiamin 6.8% Zinc 8.4%
Percent Daily Values are based on a 2,000 calorie diet. Your daily values may be higher or lower depending on your calorie needs.
Nutrition Facts Calculated Using: SparkPeople Recipe Calculator

I have also created a PDF copy for ease in printing. You can download it by clicking this link: Chocolate Peanut Butter Banana Milk Shake. You can also access any of my recipes on my new recipe page I’ve just created which can be accessed at the top of the page. Enjoy!

DIY Emi-Jays

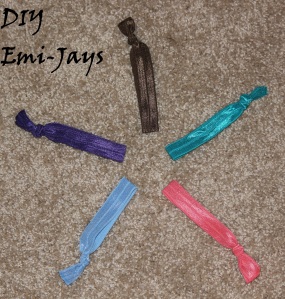
IMG_8415 EditedWhen a crafty person sees something they like they look at the price tag then  after a cry of exclamation at the price they declare “I could make that!” Isn’t this true for most of us?

Well if you have ever gotten one of the Emi-Jay hair ties you know how expensive they are. They cost several dollars apiece. If you want those hair ties but don’t want to pay that kind of money for it what is the solution? Make it yourself.

My sister found this blog which had directions to make them. You can visit it here. The only change we made to their directions was to fray check the ties. Do this after you have cut them into 12″ lengths, but before you tie them. This way the ribbon won’t start unraveling.

The photo above is of some Emi-Jays my mom made for my sisters and I. She purchased the ribbon at a local store for a reasonable price. You can also order the ribbon online from an etsy seller. They mentioned it on the blog with the directions. The cheapest I saw of those they listed was this seller. You can buy ten yards (you get to choose the colors) for only $4.99 Assuming you use 12″ per hair tie (which may seem like a lot but you really do need that much) then each hair tie costs only 17 cents not including shipping. That’s a lot better then $2 a hair tie.

I hope that you enjoy making your own Emi-Jays, and enjoy the savings!

Beaded Paper Bookmark Tutorial

I love doing lots of different crafts and one of those is beading. I have made many bracelets, necklaces, watches, and other beaded items. So when a beaded item brakes my sister (who also does a lot of beading stuff) or I fixes it. I was tasked with fixing a bookmark of my Mom’s. Someone had given her a paper bookmark with a beaded ‘tail’ and the ‘tail’ had broken.

It was a pretty simple fix and the bookmark looks great, so I thought I would create a tutorial for making Beaded Paper Bookmarks. Keep in mind this is my first tutorial. Hope you like it.

Beaded Paper Bookmark Tutorial

IMG_7629

You Will Need

IMG_7617

Bookmark
One or two pieces of scrapbook paper
Glue or Double Stick Tape
Hole Puncher
Paper Cutter
Rounder Punch

Beaded Tail
Assorted Beads to Coordinate with Bookmark
Jump Ring
Tigertail Wire
Crimp Tube
Crimp Tool
Scissors

Make It

Bookmark

  1. Cut out your scrapbook paper into two 2”x6” pieces.
  2. Glue or use double stick tape to attach the paper back to back.
  3. Punch a hole in the middle top of the bookmark.
  4. Round the corners using either scissors or a rounder punch.

Beaded Tail

  1. Put your jump ring around the hole in the bookmark.
  2. Cut your wire to more than twice the length of your beads.
  3. Thread your first bead (this bead will be on the end of the tail farthest from the bookmark) onto one of the sides of the wire.
  4. Fold the wire in half, with your first bead in the middle, and thread the rest of the beads onto both of the wires. It should now look like this:IMG_7618
  5. Thread a crimp tube onto both wires right after the last bead.
  6. Thread the wires around the jump ring and back through the crimp tube. It should look like this:                                                             IMG_7620
  7. Pull this tight, crimp the tube, and cut the wire.

IMG_7623You’re done! You now have a beautiful beaded paper bookmark.

I hope you enjoyed the tutorial. You can download a PDF version of this tutorial by clicking here: Beaded Paper Bookmark Tutorial PDF

A Couple Notes:

1. I showed a bead board in the picture with all the materials, I did not list this because it is not necessary. It is very helpful however and can be bought for only a couple dollars from Hobby Lobby and JoAnns (most likely any store that has bead items will sell these also).

2. You don’t have to have a bookmark made from two different papers, or even from more than one piece of paper, this just makes it stronger.

3. All of the items needed can be purchased from most craft stores. I get all mine from Hobby Lobby and JoAnns.

I have several more beading projects I’m working on now, so maybe you’ll be seeing some more beading tutorials soon. I hope you enjoy making your own Beaded Paper Bookmark!

New Resource Page

After posting my last post with my recommendation for Learn to Knit books I though I’d start a resource page.

And I did. You can access it above, right under the blog title. It has the categories and under that links to posts in which I have recommended certain products or other things. Right now there is only one category and one post, but the list will grow with time.

Note: I will only be linking things that I personally like and have experience with.

Learn to Knit-The Easy Way

I am very blessed in that I have a very talented grandmother who is an extremely good knitter and sewer. She was the one who taught me how to knit. I’m not sure how long ago that was but I was pretty young and my first piece had plenty of whole holes and the sides were very uneven (I was constantly dropping and making new stitches). I wish I still had that piece but I gave to my cousin for a baby blanket for her doll. Thankfully, I have improved.

How? I have knitted dozens of projects. Since, at the time I was taught, my grandmother was not close enough to help me anytime I needed it and since my mother was also learning to knit we turned to books for help (and sometimes urgent calls to grandma). My favorite learn to knit book: The Klutz Learn to Knit Kit.

We had gotten a learn to knit book before this but they didn’t have very good illustrations. The Klutz book is amazing. They have illustrations for every single explanation and project. The teach you how to cast on several ways, knit and purl stitch, and how to cast off. They also have helpful things for when you drop a stitch, how to unravel, and buying more yarn. There are six projects in it. All of them are pretty simple, useful, and well-explained. I have made five out of the six projects in the book and had great success.

I highly recommend this book for anybody who is struggling knitting or wants to learn. It has great explanations and simple projects to get you started. It also comes with the needles and yarn you need to knit several of the projects.

It is overall the best learn to knit book I have.  If you have been waiting to learn to knit don’t put it off any longer. Get this book and learn. It is such a fun activity to do and you can make all kinds of things.

Happy Knitting!

P.S. This is the first of my posts on knitting. I have been knitting for years and am still knitting. Look for posts about my current projects soon.

Best LD Debate Round Ever

Two of my siblings and I went to a Speech and Debate Camp in the summer. I though it was going to be boring, it turned out to be fun and got me really interested in debate. Why?

Cause of the awesome videos they showed us! Just kidding! But there were some really great videos of speeches and debate rounds, including this debate round.

How does this compare to a real one? This one is much funnier, I think any LD debater (which I am not by the way) or anyone who has watched an LD Debate round could agree you don’t laugh this much in a real round.

Enjoy!

Building Your Box-Scripture Memory

It is pointless to memorize something if you will forget it a couple weeks later. How do you keep from forgetting things? Use a memory system.

I try and memorize scripture passages, but if I forget them it does me no good, yet the only way I knew how was reciting them over and over again throughout the week. But that is very time consuming and difficult. Thankfully my mom showed my an easier method.

Enter the Charlotte Mason Scripture Memory System. You can find the instructions here. This system makes it easy to keep the verses memorized, but not have to recite them everyday.

I have started implementing this system for my memory verses. I am writing all my verse out on 3×5 cards, I also made my own dividers out of card stock (for the 41 dividers you need it would be expensive to buy them all, this way they can be personalized). I got a small plastic box from walmart. It is big enough that it should take me a long while to fill it up.

This system could also be used for other things. I am also reviewing and learning the rest of the Shorter Catechism. It could be used for memorizing facts for school, especially if you need to know them for finals and such tests.

I am so glad my mom found this, it has gotten me motivated to work on my scripture memory again. I hope this is a help to y’all!