Tutorial-Hot Chocolate Wallet (Christmas Wrap-up #5)

Hot Chocolate Wallet-A Free Tutorial from Everything Pudding, Use up your fabric scraps with this easy wallet that holds four hot chocolate mix packets and is perfect for travel or a camping trip

We’re down to the last Christmas Wrap-up post and this time I’ve got another free tutorial for you, a Hot Chocolate Wallet. This wallet is designed to hold 4 hot chocolate mix packets. You could use this when you’re going on a camping trip or visiting friends to ensure that you always have your favorite hot chocolate mix with you.

Hot Chocolate Wallet-A Free Tutorial from Everything Pudding, Use up your fabric scraps with this easy wallet that holds four hot chocolate mix packets and is perfect for travel or a camping trip

This is a really easy project to make and is great for using up small pieces of leftover fabric. I’ve already made three of these using leftover fabric so I’m starting to make a dent into my large stash. I made my first one in order to figure out whether the idea I had in my head would work out exactly as I thought it would. I picked this cute flower pattern to use for my first go and it worked out really well. I didn’t have to change anything when I went and made the next two that I gave as Christmas gifts.

Hot Chocolate Wallet-A Free Tutorial from Everything Pudding, Use up your fabric scraps with this easy wallet that holds four hot chocolate mix packets and is perfect for travel or a camping trip

So now it’s your turn. Download the tutorial here: Hot Chocolate Wallet Tutorial and start sewing!

As always, this tutorial is for personal use only. You may not reproduce this and you may not make items from this tutorial to sell. Thanks for respecting my hard work!

Tutorial-Shoe Bags

IMG_2755 - Cover Photo #1

Shoes are something we can’t go without especially when traveling. However the fear that my nice shoes would get scuffed up while in the suitcase or that my tennis shoes would leave dirt on my clothes prompted me to used walmart bags for my shoes. However walmart bags are most certaintly not pretty. In order that I might protect my shoes in something pretty I made myself some shoe bags. And in order that you might protect your shoes in something pretty I made you a tutorial and am sharing it.IMG_2751 - Cover Photo #3

I have seen several different tutorials for shoe bags out there. They are what first gave me the idea to make some for myself. However none of them were exactly like I wanted, so I made my own.

I wanted a totally finished bag, meaning no exposed seams and thread. I also wanted a shoe bag with two “pockets”, that way the shoes wouldn’t mess each other up. I accomplished this by using french seams and sewing two seams down the middle of my bag creating the two “pockets”.

IMG_2724 - Cover Photo #2

The bags were so easy I made three, enough for all the pairs of shoes I needed to take on my trip for a speech and debate tournament.

So now it’s your turn. Pick out some fabric, grab a sewing machine, and download my tutorial to get started: Shoe Bags Tutorial by Everything Pudding.

Project Series-Handmade Travel

There are so many projects that I want to make.  Since we’ve been traveling for tournaments I thought I’d make some things that would be useful for tournament travel. Some of these include: toiletry cases, contact and glasses case, etc. Some of these will be using someone else’s free tutorials and some of them I will be making myself. I’ll be posting them as I finish them, which make take a while.

Projects Ideas for Handmade Travel
Laundry Bag
Toiletry Case
Hair Things Organizer
and many more…

Completed Projects:
Luggage Tag
Shoes Bags

Hopefully these tutorials and projects will help you. I’ll be posting on some of these soon so keep checking back. I’ll also be making a page where you can get updates on all the projects!

Got any ideas for good projects for this series, let me know, I’d love to get ideas.

Project-Luggage Tags

IMG_9499 - Edited

This school year my family began doing speech and debate. One of the speeches I chose to do is an illustrated oratory (Don’t know what this is? Watch a national qualifying one from 2008 about Caffeine here). When going to tournaments with this speech it adds more things to carry. Thankfully at tournaments they have these awesome IO storage rooms so you can bring in your stuff on Day 1 and leave it overnight until the whole tournament is over without having to lug it back and forth from the hotel. Since there are so many people’s stuff in the one room and several people have the same bag for my boards as I do I put my name on all of my things that I leave there. For my easel I stuck a label on it, for my box (a shoe box which I covered in paper to look nicer) I wrote on it, and for my bag I used a luggage tag.

For my first tournament I made an improvised luggage tag using some cardstock, but for my later tournaments I sewed myself a luggage tag out of some leftover fabric. Here’s how I did it:

I figured there was a pattern out there so I searched Pinterest and sure enough lots popped up. After looking at several of them I chose this one.

I decided to make three using three different scraps of fabric leftover from past projects.

I followed her instructions except since I didn’t have any vinyl I used page protectors and just cut them up. It worked really well. To sew the page protectors on I used a business card as a guide. I used tape to stick it on to the tag and then placed the page protector piece on top and used big clothspins to hold it in place. Then I stitched using the business card as a guide. It worked very well.

Side note: Several people mentioned using a teflon foot to sew the vinyl on so the vinyl doesn’t stick to your sewing machine foot. I didn’t have any problems with the page protectors sticking and I used a regular foot so if you use page protectors you shouldn’t have to worry about that.

IMG_9473 - Edited

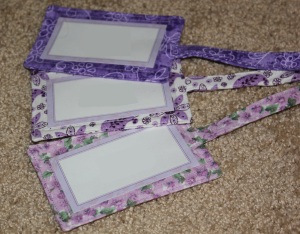
After I finished all three luggage tags (can you tell I like purple?) I used Microsoft Publisher and made some pretty business cards. They fit perfectly!

This project is great for using up fabric scraps and would make a great gift for a traveler. Plus, they’re super easy; I made three of them in an hour or two. I hope you enjoy making some of your own.

Happy Sewing!